Introduction
Clinical and Pracsoft are updated periodically via MedicalDirector Automatic Update, which is installed automatically with MedicalDirector Clinical and/or Pracsoft. Occasionally, software updates are released on DVD, and distributed to users on physical media instead.
For convenience, MedicalDirector also offers a DVD ‘image’ (or ISO) which can be downloaded from the MedicalDirector product download page. By downloading an ISO, you can mount it and run it from your computer as if you were using the actual physical DVD media, plus you can use DVD-writing software to burn the ISO onto DVD media, thus creating a DVD that you can take with you or distribute to other users at your Practice.
This guide explains how to mount an ISO using MagicDisc software, or burn it onto blank DVD media using Roxio Creator software. Note that MedicalDirector does not recommend these applications specifically, rather they are used here in order to illustrate the basic concepts of mounting and burning MedicalDirector Application ISOs - your software of choice may differ slightly from what is explained here.
If you are unsure of any terminology or procedures mentioned here, please consult your Systems Administrator for assistance.
Mounting a CD Image
This process allows you to load a DVD image file of Clinical / Pracsoft into Windows, and access it as if the actual DVD was in your computer’s DVD drive.
1. Download the Clinical/Pracsoft ISO that you wish to use, making a note of the location to which you save it.
2. Ensure you have downloaded and installed MagicDisc (or equivalent cd-mounting software of your choice). The DVD-mounting software you install will create a virtual DVD-drive which Windows sees as a physical drive, assigning it a drive letter such as ‘E’ (this may vary, depending on what drive letters are already being used by your computer).
3. Locate the MagicDisc icon ![]() in your Windows Task Bar.
in your Windows Task Bar.
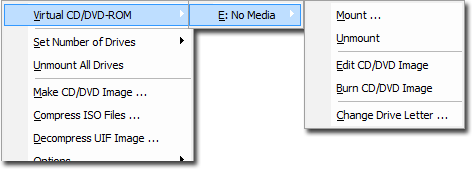
4. Right-click the MagicDisc icon and select Virtual CD/DVD-ROM > E: No Media > Mount.
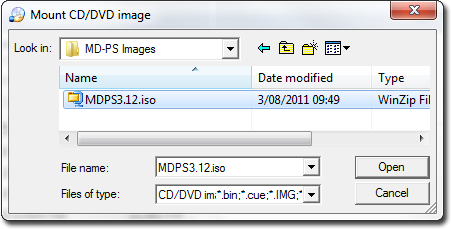
5. The Mount CD/DVD Image window appears. Locate and select the MD/PS ISO you wish to load. Click the Open button when you are ready to proceed.
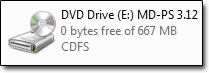
6. Browse Windows Explorer / My Computer, and you should now see the MD/PS ISO loaded into your virtual CD/DVD-drive. In the example below, it reads ‘DVD Drive (E:) MD-PS 3.12’.
7. Double-click the DVD icon to access the virtual CD/DVD.
8. Locate and double-click Setup.exe to commence the Clinical / Pracsoft Installation Wizard.
9. (optional) Once you have finished installing MD/PS, you may wish to un-mount the ISO if you no longer need it. To do this, simply right-click the MagicDisc icon and select Virtual CD/DVD-ROM > [your mounted ISO] > Unmount.
Creating a Physical CD from an ISO
This process allows you to create (or burn) a DVD of MedicalDirector Clinical / Pracsoft from an image (ISO) file. You can then load this DVD into a computer at your Practice and install Clinical / Pracsoft from it.
1. Download the Clinical/Pracsoft ISO that you wish to use, making a note of the location to which you save it.
2. Ensure you have downloaded and installed Roxio Creator (or equivalent cd-burning software of your choice).
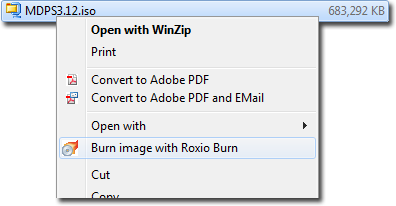
3. Within Windows Explorer, locate and right-click the Clinical/Pracsoft ISO file.
4. From the menu that appears select Burn image with Roxio Burn. If you have not already inserted a blank DVD into your CD burner’s drive, you will be prompted to do so now.
5. The following Roxio prompt will appear in your Windows Task Bar: ![]()
6. Click the Burn DVD  button on the Roxio prompts.
7. The DVD burning process commences, and its progress is displayed. ![]()
8. You will be prompted upon a successful burn.

9. Click the Done button. The DVD will be ejected. You have now created a DVD of Clinical / Pracsoft.